Many older 150cc models have zero wiring support. Even manufacturers that are still in business sometimes refuse to produce wiring harnesses for discontinued models. Use this guide to DIY retrofit your machine with a quality USA-made harness, without costing an arm and a leg.
Why upgrade to the American BDX GY6 electrical harness?
Chinese harness designs are usually dirt cheap, not designed for reliability or how to get the best electrical performance. If you’ve been chasing gremlins, it’s time to upgrade.
Our spark strength is wickedly strong
The video below is from a warranty repair I decided to get on video to show off our spark. Even on a used BDX harness, the strength of our spark blows away Chinese electrical systems.
Compare that to the spark on your machine. The difference is easy to see.
Step 1: Read this article fully before buying anything
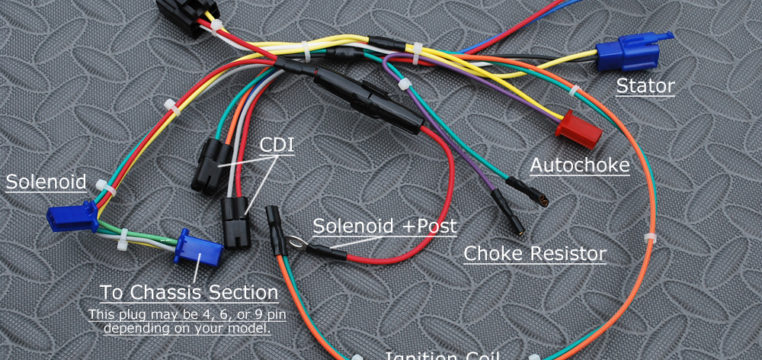
The harness pictured below is our version of the Tomberlin CF150R engine wiring harness, made with 100% American wire and built here in VA, USA. It covers all basic functionality. It will last years even in direct sunlight (don’t do that though), or decades if you keep it covered. It is the best choice when overhauling your engine wiring.
It’s not a plug-n-play job though. You will have to use a multimeter to track down up to 6 wires from your frame, and match them to the new harness. Keep reading to judge if you want to take on the job.
Important note on support: We don’t offer live support for wiring jobs. We simply can’t spend the time to go through each wire with you, and will have to refuse the call. We provide the information and resources you need, but it’s completely up to you to understand the wiring and do the legwork.
The purpose of this guide is to give you the overall information you need to tackle the job yourself. Please keep this in mind.
Step 2: Become familiar with the retrofit harness
GET IT HERE: Wiring Harness, Engine, for Tomberlin Crossfire

Step 3: Determine if you have a 4, 6, or 9 wire chassis plug
Look for the bundle of wires coming from the front of the frame. This will be your chassis harness connector. Every 150cc vehicle is different. It’s up to you to determine which version you have.
Step 4: Connect the common items
Use this picture to connect to each item labeled.
Step 5: Use your multimeter to trace the pins in your chassis connector
Match your chassis wires to the wires in the new harness:
Light green wire: Solenoid ground
Read this 3 times, slowly, because it’s a common point of confusion: The solenoid doesn’t get power from the switch. The switch grounds the solenoid to start the engine.
Grey wire: CDI Ground
This wire grounds the CDI. It is usually connected to a switch so that when the switch is turned off, ground is interrupted and the CDI can’t produce spark. This is meant to be a backup in the case that your killswitch fails to stop the engine.
Yellow: AC power
You can use this for lighting, or leave it open.
Dark green: Ground
This is your ground. It should not be interrupted in any way or things won’t work.
Red: 12v Power
Use this for lighting, or any number of accessories.
I ordered be for reading this. Hope I have right components